Sheet Of Ice In The Bottom Of The Freezer? (We Have a Few Fixes)

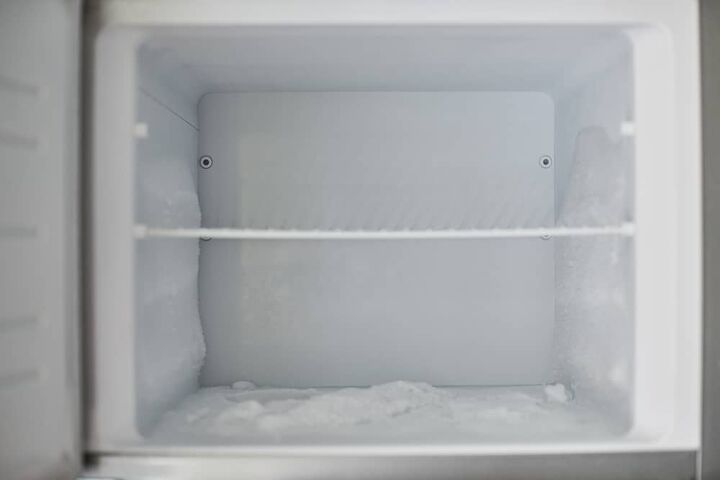
When you open your freezer, you expect to find ice inside–in the automatic dispenser or an ice cube tray. The last place you want to see it is in a thin sheet on the inside floor. How does this happen, and what can we do to fix it?
Sheet ice appears on the bottom of the freezer the drain line is clogged or if the power goes out. Water melts away from the defrost timer and the water can freeze and form sheet ice when it hits the bottom surface. Empty your drip pan manually so that sheet ice doesn’t appear in your freezer.
There are three steps to fully correcting this problem: first, you need to remove the ice. Second, you’ll need to make sure the drain line is clear, and third, make sure the runoff is draining properly. Though a maintenance specialist can take care of this, anyone can troubleshoot and fix this problem with some simple tools.
Do You Need Appliance Installation or Replacement?
Get free, zero-commitment quotes from pro contractors near you.

What Causes Freezer Leaks?
The freezer’s frost-free function works intermittently to clear any ice or frost the coils collect from regular function. The ice melts, and the water drips toward a drain valve located beneath the coils. It then flows from the drain into a drip pan under the unit and repeats the cycle continuously.
Usually, a leak in your refrigerator or freezer involves a blocked drain or clogged drain lines. In more extreme cases, the condenser coils in the back have frozen over due to dirt or blockage. When any of these areas are blocked, the water has no place to go and freezes on the appliance floor.
How and Where Do I Find the Leak?
If your freezer is leaking water inside the cabinet, you will need to find the drain’s location. Since the condenser coils are typically in the back, it’s a good bet that’s where you’ll find the drain. The exact location will depend on the model–whether it’s a top, French drawer, or side-by-side freezer.
To find the drain, the first thing you have to do is move all of the food into another area. Another freezer is the most ideal option, but an insulated cooler will work just as well. Once you relocate the food, you’ll have to gain free access to the freezer’s back wall.
With a top or side-by-side freezer, the most you may have to do is move a few shelves. With a French door model, you will also have to remove the entire drawer from the unit. After that, remove the back panel if necessary to expose the condenser coils.
What Causes Clogs in the Drain?
There are a couple of reasons you may find a blocked freezer drain. If too much runoff water collects inside of the freezer, it will freeze again and cover the drain hole completely. If the drain hole is clear and there’s still a backup, there is likely debris caught in the drain tube.
How Do I Clear the Drain?
Once you pinpoint the cause, you can determine the best way to clear the drain. A blocked drain is the easiest to remedy: simply melt the ice so the water can flow out. There are a few ways to accomplish this with different rates of speed.
The easiest way is to unplug the whole appliance and let it sit for a couple of days. It’s also inconvenient, as you’d have to store all your refrigerated food elsewhere. The fastest is to use a heat gun or hairdryer to quickly thaw the ice and remove the water.
If the drain tube is clogged, you’re looking at a more involved process. A professional appliance technician can remedy this situation easily. However, a handy person can do the repair using a few simple tools.
How Do I Clear the Drain Line?
Naturally, before starting any repair work, it’s wisest to unplug the appliance. Unscrew and remove the back panel to expose the condenser coils. Wave the heat gun or hairdryer back and forth to keep from melting any plastic components.
Once the ice melts, watch and listen to the drain to see if the water is going out. If the water still isn’t moving, you’ll have to flush the line to clear any unseen blockage. You’ll need a solution of one teaspoon baking soda and two cups of hot water, along with a turkey baster.
Mix the solution and use the turkey baster to force it down the drain tube. This mixture should remove any additional ice and debris so the water can drip into the condensation pan underneath. Once the freezer is draining again, replace the back panel, replug the appliance, and put the food back in.
How Do I Remove the Ice from the Freezer Floor?
With any luck, your freezer’s drain is positioned so the melted ice can naturally flow out of the drain hole. If there is still standing water on the freezer floor, you will have to divert the water toward the drain. Barring that, your only other option is some elbow grease and lots of absorbent towels.
If you didn’t defrost your freezer and there’s an ice layer, it may be thin enough to chisel off. Be sure you use a flat, blunt edge so as not to scratch or puncture the freezer floor. You will likely still have to tend to the condenser coils and drain, though.
Do I Need to Empty the Drip Pan?
The evaporator pan is designed to catch the water runoff from the defrost cycle so it can naturally evaporate. Depending on how much ice built up in the freezer, you may have to empty the pan manually. If this is the case, you’ll need to find its location under the appliance.
Generally, you can access the refrigerator drip pan from the back of the unit. You may have to physically move the appliance to reach underneath and remove the pan. Be sure to keep the pan level in case the water runoff is higher than normal.
Dump the excess water and put the pan back in place under the refrigerator. You should not have to dry it off first, but you can if you would like. If you got the drain line fully cleared, there should be no more overflow.
Do You Need Appliance Installation or Replacement?
Get free, zero-commitment quotes from pro contractors near you.

Related Questions
How do I prevent frost buildup in my freezer?
Despite the advances in refrigeration and frost-free technology, these systems are still susceptible to malfunction and frost buildup. Many people make the mistake of blocking the air vents in the freezer or storing too much food inside. This can cause condensation to form on both the condenser coils and the blower fan and create frost.It is important to keep the vents clear in the freezer so the air can properly circulate. This will not only help to prevent unnecessary frost but helps the appliance run more efficiently. Good air circulation also keeps foods at the correct temperature and prevents premature thawing.As for freezers with manual defrost, keeping the ice at bay will take more time and effort. Besides unplugging the freezer, you can use a wet/dry vacuum or bowls of hot water to pre-soften the ice. Always use plastic or wooden scrapers with blunt edges, as metal implements can scratch or damage the surface.
What is the most efficient way to stock my freezer?
There’s an art to freezer storage that maximizes space and keeps it running efficiently. You want to make sure to fully stock the freezer while taking care not to inhibit air circulation. Since a full freezer stays colder, some clever storage techniques will help achieve both of these goals.Use airtight, compact packaging to store food, such as foil, plastic freezer bags, and tight-lidded containers. Ensure everything is closed or wrapped as closely as possible and is level enough to stack without toppling over. Remember, smaller is better, so separate large packs of food into usable serving sizes.
What is the best way to maintain a chest freezer?
A chest freezer is a great appliance to stock a large quantity of perishable food for future use. Because chest freezers almost always have manual defrost systems, they keep items colder longer than their frost-free counterparts. However, this means that thick frost layers are inevitable, and regular defrosting will be necessary.You can employ the same methods used to clear drain blockage in frost-free refrigerators to defrost chest freezers. It’s extremely helpful that chest freezers have a drain plug installed in the bottom to clear water from inside. Defrost the chest freezer twice a year, thoroughly cleaning and drying the inside to keep it running smoothly.Inspecting the components, along with careful space planning, also boosts the freezer’s operation and lifespan. Check that the gasket is not torn and holds its seal, and make sure the thermostat functions well. Compartmentalized organization limits how long the door stands open, which helps retain cold, reduce internal humidity, and save energy.

Stacy Randall is a wife, mother, and freelance writer from NOLA that has always had a love for DIY projects, home organization, and making spaces beautiful. Together with her husband, she has been spending the last several years lovingly renovating her grandparent's former home, making it their own and learning a lot about life along the way.
More by Stacy Randall




![10 Best Scroll Saws for 2022 [Ultimate Reviews & Buyer's Guide]](https://cdn-fastly.upgradedhome.com/media/2023/07/31/9070684/10-best-scroll-saws-for-2022-ultimate-reviews-buyer-s-guide.jpg?size=350x220)



![Standard Dining Room Table Dimensions [for 4, 6, 8, 10 and 12 People]](https://cdn-fastly.upgradedhome.com/media/2023/07/31/9074335/standard-dining-room-table-dimensions-for-4-6-8-10-and-12-people.jpg?size=350x220)
