Why Do I Have Two Black Wires On My Light Switch?

How many people does it take to change a light bulb? This old joke comes with a variety of tongue-in-cheek answers. However, when we start talking about changing a light switch, the jokes die down a bit. Changing out your old almond light switch for a more modern look is not as hard as it may seem. However, if you are new to the game, it is better to call an electrician or try it out under the eye of someone experienced in the field.
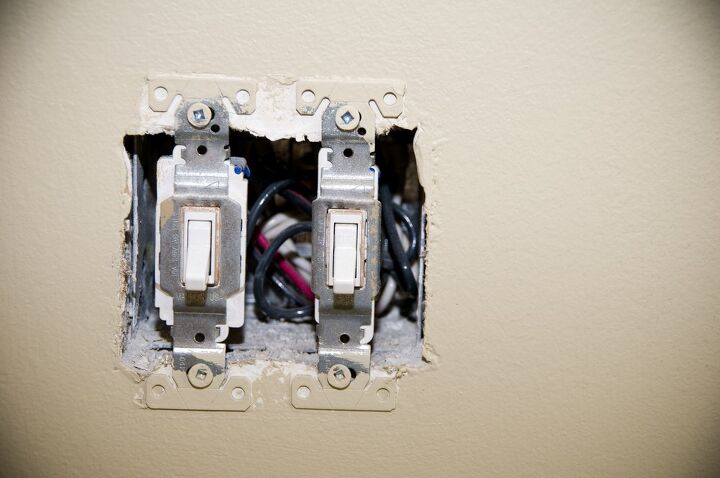
If you take the light switch cover off, you will notice a few different colors of wires running through the box. So, what is the purpose of the two black wires in the light switch?
The two black wires connected to your light switch are called hot wires or terminal wires. The first black hot wire will connect to the bottom terminal screw. Then, the second hot wire will connect to the top terminal screw and run through the ceiling box to the light fitting. You will also notice white neutral wires and green or copper ground wires in your light switch.
We’ll look at how to safely work with your light switch and give you an idea of what goes on inside when you turn on the light bulb.
Do You Need to Hire an Electrician?
Get free, zero-commitment quotes from pro contractors near you.

A Bit About Your Light Switch
If you take off your light switch plate, you will see a few different color wires. However, where do they come from and where do they go?
Residential homes have a breaker box as the main center for the wires in your home. If one area of your home is overloaded on the electrical front, it can trip the breaker and leave that part of the home without power. Most of us have had experience checking out the breaker box and turning areas of the house on and off. The breaker box is exactly where you should start when you are working on any part of your home involving electricity. Flip the breaker that is connected to your light switch off so you can work safely.
A Word of Caution
While changing out a light switch is mostly a matter of moving your existing wires to a new switch, you are still dealing with electricity. Electricity can cause harm or be fatal if handled incorrectly. If you do not feel confident in your skills, or it is your first time working with a light switch, call someone qualified in the field of electricity to help you out.
Also, you don’t want to ever try to run new wires on your own. This is a job for an electrician.
What happens if a light switch is wired incorrectly?
Your light may still work even if the wires are reversed. However, if you fix the hot wire where the neutral wire should be, this could give you a shock when you are changing the bulb. In a worst-case scenario, it could spark, causing a fire. It is important to return each wire to the correct position when you work with light fixtures.
Luckily, if you are changing out a single-pole light switch, you will only work with the ground wires and hot wires. This process is fairly simple and straightforward. If more intense work or repairs need to be done to your light, we recommend calling a qualified electrician.
Replacing a Single Pole Light Switch
If you are changing out your light switches, a single pole light switch with one input and one output will be the most straightforward. Here are the general steps to follow:
Step 1: Cut off power to the light switch at your breaker box
This step is simple, but the most important. Forgetting to cut off the power while you work on a light switch could be fatal. Once you have turned off the breaker, you will want to try the switch to make sure it is off.
Step 2: Take off the light switch plate
You will want to unscrew and remove your light switch plate. Then unscrew your light switch from its box.
Step 3: Locate your wires and unfasten them from your old switch
Inside the light switch box, you should see two black wires, two white wires, and 3 green (or copper) wires. Free your terminal wires and then your ground wire from the switch. You may need to loosen the screws on the switch to free your wires.
Step 4: Remove the old light switch
Once you have safely removed your wires. You can now remove the old light switch.
Step 5: Attach the new light switch
Fit the hooked ends of your wires snugly to your new light switch. Connect the two black wires to the terminal screw. Then attach the green ground wire.
While you will also see the white neutral wire inside your light plate, this wire does not attach directly to your light switch. Instead, it will run directly to your light. So, just leave the neutral wire in place.
Step 6: Replace your light switch’s plate
Screw your light switch plate back on.
Step 7: Try out your light
When you are done, turn your breaker back on and try out your handiwork!
Do You Need to Hire an Electrician?
Get free, zero-commitment quotes from pro contractors near you.

Related Questions
What is the current trend in light switches?
There was the push button light switch, the dimmer knob, and the flip switch. Now a new trend is beginning for the light switch, the smart switch. This light switch makes turning your lights on and off even more convenient. You can control your lights without having to get up and flip the switch. Many smart light switches are multi-way switches that you are able to control remotely.
Which light bulbs are the most efficient?
LED light bulbs are much more efficient than their incandescent, energy-efficient light bulbs (CFLs), and halogen counterparts. LEDs provide a solid light source and also use less electricity. You will notice LED lightbulbs often have a longer life span than other types of light bulbs.
Is a positive wire the same as a hot wire?
A positive wire has the same meaning as a hot wire or live wire. This wire carries electricity. It is the source of electricity and can be dangerous if handled incorrectly. In the U.S., this wire will usually be black in color.

Alex Praytor is a native Texan who got her degree in English Literature and decided to travel the globe. She finds the architecture and design of homes across cultures fascinating. In her spare time, she visits coffee shops with her family and creates projects for their own home. Alex enjoys sharing tips on how to keep repairs up to date while turning a house into a home.
More by Alex Praytor


